
OAuth2 Authorization Code Flow Authentication Using Owasp ZAP (Part 1)
This tutorial shows you how to perform authentication on a client web application that uses OAuth2 Authorization Code Flow in its code, to communicate with the Authorization and Resource server. Please take note that we are replicating the authentication steps from the perspective of the user of the client web application. The client web application is the target of Zap.
Prerequisites:
- Java 1.8
- Maven (https://maven.apache.org/download.cgi) or
Gradle (https://gradle.org/install/). We are using Maven for this example. - A developer account with Okta, further instructions in “The Setup” below.
- Owasp Zap 2.9
- Eclipse or any Java editor that will help build the resource server, a Spring based web application that will use the Okta authorization server, or alternatively, you can just download the zip file in the Resources section at the bottom to get started quicker. Please also take note that you can also replace this Spring based web application server with your own application as long as you have it configured to talk to Okta.
- If you need to visually see how the Authorization Code Flow is like, this link – https://auth0.com/docs/flows/concepts/auth-code will help.
Disclaimer: This blog post is not sponsored by Okta nor is this an endorsement of Okta as an authorization server. This is just for demonstration purpose only.
The Setup
Go to https://dzone.com/articles/build-an-oauth-20-authorization-server-with-spring , go to the section “Create an OpenID Connect Application” and follow the instructions there on how to set up the Okta developer account.
When you reach the section Create a New Spring Boot App, you can continue to follow the instructions there or download from the Resources section the zip file, that will have the needed files provided.
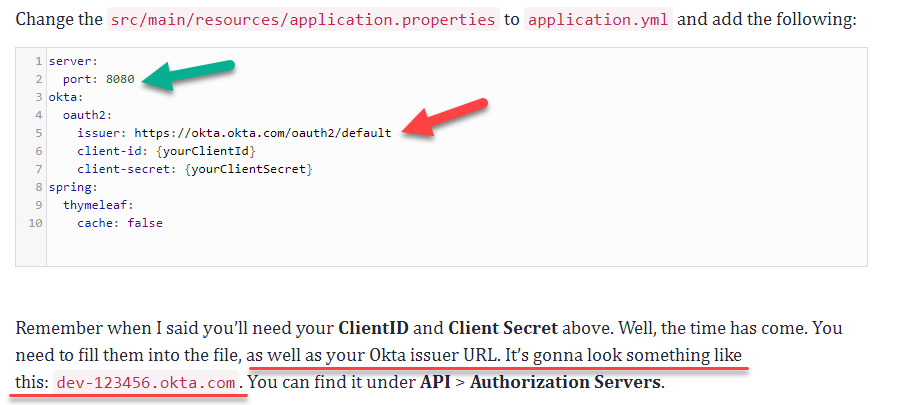
One of things you need to take note is to change the Okta Issuer Url besides the ClientID and Client Secret as highlighted in red in the image below.
Note also that the Okta Issuer Url is also the sign-in url that you will put into your browser after you have created your account with Okta to log into your own space. More details can be found here – https://support.okta.com/help/s/sign-in-url
Also, please change the server port to 8090 or any other port number as highlighted by the green arrow, that does not clash with ports that Zap is using.
Once you have the spring web application set up, go to the command line and type in “mvn spring-boot:run”. This will take a short while until you see something like “Started OktaOAuthClientApplication in 9.816 seconds“.
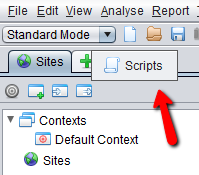
Once the spring web application is started, launch Zap and go to the Scripts tab.
Add in a new script under Authentication. Let’s call it oauth2_authorization_code_flow_script and set it up like below and save it.

Copy the code below that will do the authentication when you are spidering the web application via Zap.
// Parameters:
//		helper - a helper class providing useful methods: prepareMessage(), sendAndReceive(msg)
//		paramsValues - the values of the parameters configured in the Session Properties -> Authentication panel.
//					The paramsValues is a map, having as keys the parameters names (as returned by the getRequiredParamsNames()
//					and getOptionalParamsNames() functions below)
//		credentials - an object containing the credentials values, as configured in the Session Properties -> Users panel.
//					The credential values can be obtained via calls to the getParam(paramName) method. The param names are the ones
//					returned by the getCredentialsParamsNames() below
function authenticate(helper, paramsValues, credentials) {
	print("Okta Oauth2 Authorization Code Flow authenticating via JavaScript script...");

     var authorizationOktaUrl = paramsValues.get("authorizationOktaUrl");
	print("1) making request");
	var msg = callGet(helper, authorizationOktaUrl, null);
	var locationUrl = decodeURIComponent(msg.getResponseHeader().getHeader("Location"));

	// Prepare the login request details
     var authorizationOktaUrl = paramsValues.get("authorizationOktaUrl");
	print("1) making request");
	var msg = callGet(helper, authorizationOktaUrl, null);
	var locationUrl = decodeURIComponent(msg.getResponseHeader().getHeader("Location"));

	print("2) making request");
	msg = callGet(helper, locationUrl, null);
    	locationUrl = decodeURIComponent(msg.getResponseHeader().getHeader("location"));
	var fromURI = locationUrl.substring(locationUrl.indexOf("?")+1);
	var oktaKey = getAllUrlParams(fromURI).okta_key;
	print("oktaKey:"+oktaKey);

	print("3) making request");
	msg = callGet(helper, locationUrl, null);

	var apiAuthEndpoint = paramsValues.get("apiAuthEndpoint");
	var apiAuthEndpointRequestBody = paramsValues.get("apiAuthEndpointRequestBody");
	print("4) making request");
	msg = callPost(helper, apiAuthEndpoint, apiAuthEndpointRequestBody);
	var sessionToken = JSON.parse(msg.getResponseBody()).sessionToken;
	print("sessionToken:"+sessionToken);

	var sessionCookieRedirect = paramsValues.get("sessionCookieRedirectUrl");
	sessionCookieRedirect = sessionCookieRedirect.replace("{sessionToken}",sessionToken);
	sessionCookieRedirect = sessionCookieRedirect.replace("{oktaKey}",oktaKey);
	print("5) making request");
	msg = callGet(helper, sessionCookieRedirect, null);
	locationUrl = decodeURIComponent(msg.getResponseHeader().getHeader("location"));

	print("6) making request:");
	msg = callGet(helper, locationUrl, null);
	locationUrl = decodeURIComponent(msg.getResponseHeader().getHeader("location"));

	print("7) making request");
	msg = callGet(helper, locationUrl, null);
	locationUrl = decodeURIComponent(msg.getResponseHeader().getHeader("location"));

	return msg;
}

function callPost(helper, requestUrl, requestBody){
	var HttpRequestHeader = Java.type("org.parosproxy.paros.network.HttpRequestHeader")
	var HttpHeader = Java.type("org.parosproxy.paros.network.HttpHeader")
	var URI = Java.type("org.apache.commons.httpclient.URI")
	print("-----start of callPost-------");
	var requestUri = new URI(requestUrl, false);
	print("url encoded request body:"+requestBody);
	var msg = helper.prepareMessage();
	var requestHeader = new HttpRequestHeader(HttpRequestHeader.POST, requestUri, HttpHeader.HTTP10);
	requestHeader.setHeader("content-type","application/json");
	requestHeader.setHeader("Accept","application/json");
	msg.setRequestHeader(requestHeader);
	msg.setRequestBody(requestBody);
	print("Sending POST request: " + requestHeader);
	helper.sendAndReceive(msg);
	print("\nReceived response status code for authentication request: " + msg.getResponseHeader());
	print("\nResponseBody: " + msg.getResponseBody());
	print("------------------------------------");
     return msg;
}

function callGet(helper, requestUrl, queryParameters){
	var HttpRequestHeader = Java.type("org.parosproxy.paros.network.HttpRequestHeader")
	var HttpHeader = Java.type("org.parosproxy.paros.network.HttpHeader")
	var URI = Java.type("org.apache.commons.httpclient.URI")
	print("-----start of callGet-------");
	var requestUri = new URI(requestUrl, false);
	var msg = helper.prepareMessage();
	var requestHeader = new HttpRequestHeader(HttpRequestHeader.GET, requestUri, HttpHeader.HTTP10);
	print("Sending GET request: " + requestHeader);
	msg.setRequestHeader(requestHeader);
	helper.sendAndReceive(msg);
	print("Received response status code for authentication request: " + msg.getResponseHeader());
	print("------------------------------------");
     return msg;
}

// This function is called during the script loading to obtain a list of the names of the required configuration parameters,
// that will be shown in the Session Properties -> Authentication panel for configuration. They can be used
// to input dynamic data into the script, from the user interface (e.g. a login URL, name of POST parameters etc.)
function getRequiredParamsNames(){
	return ["authorizationOktaUrl","apiAuthEndpoint","apiAuthEndpointRequestBody", "sessionCookieRedirectUrl"];
}

// This function is called during the script loading to obtain a list of the names of the optional configuration parameters,
// that will be shown in the Session Properties -> Authentication panel for configuration. They can be used
// to input dynamic data into the script, from the user interface (e.g. a login URL, name of POST parameters etc.)
function getOptionalParamsNames(){
	return [];
}

// This function is called during the script loading to obtain a list of the names of the parameters that are required,
// as credentials, for each User configured corresponding to an Authentication using this script
function getCredentialsParamsNames(){
	return [];
}

//source: https://www.sitepoint.com/get-url-parameters-with-javascript/
function getAllUrlParams(url) {

  // get query string from url (optional) or window
  var queryString = url ? url.split('?')[1] : window.location.search.slice(1);

  // we'll store the parameters here
  var obj = {};

  // if query string exists
  if (queryString) {

    // stuff after # is not part of query string, so get rid of it
    queryString = queryString.split('#')[0];

    // split our query string into its component parts
    var arr = queryString.split('&');

    for (var i = 0; i < arr.length; i++) {
      // separate the keys and the values
      var a = arr[i].split('=');

      // set parameter name and value (use 'true' if empty)
      var paramName = a[0];
      var paramValue = typeof (a[1]) === 'undefined' ? true : a[1];

      // if the paramName ends with square brackets, e.g. colors[] or colors[2]
      if (paramName.match(/\[(\d+)?\]$/)) {

        // create key if it doesn't exist
        var key = paramName.replace(/\[(\d+)?\]/, '');
        if (!obj[key]) obj[key] = [];

        // if it's an indexed array e.g. colors[2]
        if (paramName.match(/\[\d+\]$/)) {
          // get the index value and add the entry at the appropriate position
          var index = /\[(\d+)\]/.exec(paramName)[1];
          obj[key][index] = paramValue;
        } else {
          // otherwise add the value to the end of the array
          obj[key].push(paramValue);
        }
      } else {
        // we're dealing with a string
        if (!obj[paramName]) {
          // if it doesn't exist, create property
          obj[paramName] = paramValue;
        } else if (obj[paramName] && typeof obj[paramName] === 'string'){
          // if property does exist and it's a string, convert it to an array
          obj[paramName] = [obj[paramName]];
          obj[paramName].push(paramValue);
        } else {
          // otherwise add the property
          obj[paramName].push(paramValue);
        }
      }
    }
  }

  return obj;
}
A few things to take note about this script:
1) This authentication script is specific to Okta even though generally it follows the Oauth2 Authorization Code Flow sequence of calls. Basically the sequence of calls in the authenticate function simulates what a user will go through when trying to access a secured area of the website and getting redirected to log in and finally getting access. You can modify this script for your use case if you are using a different authorization server or even resource server. If you ever want to know what http requests are being made during the authentication phase from a user’s perspective, you can launch firefox from Zap (shown below) and authenticate through the browser. This way, you can see all the http requests being made from the browser’s perspective to complete the authorization process so that you can replicate that in the authenticate function.

2) The callGet and callPost functions are reusable functions that will help you make GET and POST calls.
3) There are 4 parameters that you will need to provide in getRequiredParamsNames function. They are authorizationOktaUrl, apiAuthEndpoint, apiAuthEndpointRequestBody, sessionCookieRedirectUrl. We will show you how to populate them below.
4) The source code of getAllUrlParams function is from https://www.sitepoint.com/get-url-parameters-with-javascript/ under the section “Rolling Your Own Query String Parsing Function” but with some deletions to not make changes to the casing of the query parameter names and values. The code snippet that was removed is shown below.

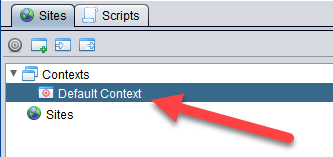
Going back to the Sites tab. Double click on the Default Context to open up the Context dialog box.
Navigate to Authentication section and select Script-based Authentication and select the oauth2_authorization_code_flow_script script that was created above and click on the Load button.
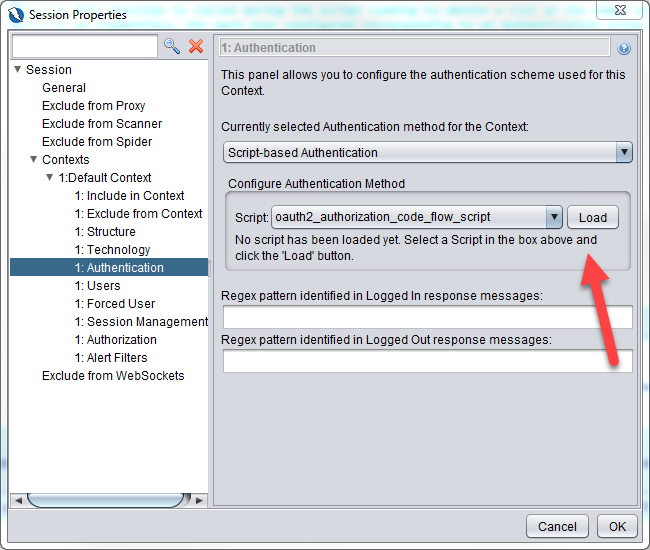
You will see the required parameters that you have defined in getRequiredParamsNames function in the dialog box.
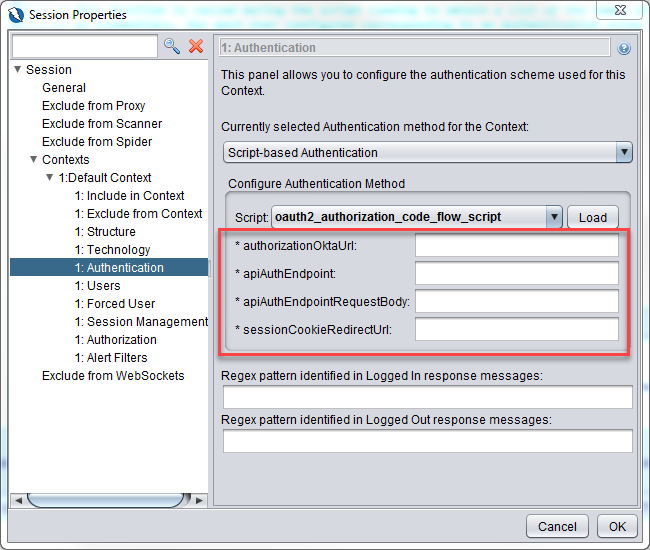
authorizationOktaUrl:
http://localhost:8090/oauth2/authorization/okta
apiAuthEndpoint:
https://dev-<okta-assigned-id>.okta.com/api/v1/authn
apiAuthEndpointRequestBody:
{“password”:”<your-okta-password>”,”username”:”<your-okta-username>”,”options”:{“warnBeforePasswordExpired”:true,”multiOptionalFactorEnroll”:true}}
sessionCookieRedirectUrl:
https://dev-<okta-assigned-id>.okta.com/login/sessionCookieRedirect?checkAccountSetupComplete=true&token={sessionToken}&redirectUrl=https%3A%2F%2Fdev-<okta-assigned-id>.okta.com%2Foauth2%2Fv1%2Fauthorize%2Fredirect%3Fokta_key%3D{oktaKey}
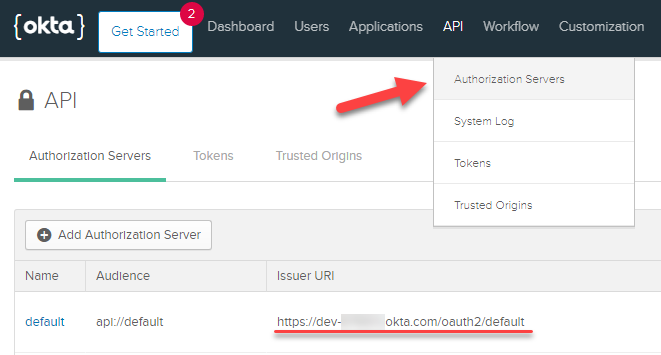
<okta-assigned-id> can be found under API->Authorization Servers
<your-okta-password> and <your-okta-username> is what you use to login into your sign-in url.
{sessionToken} and {oktaKey} will replaced by the authentication script as they are dynamic
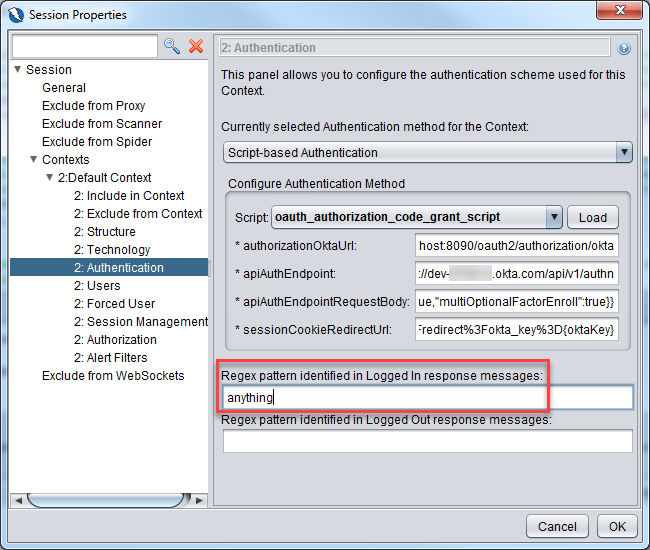
The Regex pattern identified in Logged in response messages can be set to anything for this example. We can also leave the logged out indicator empty.
Go to Part 2
This tutorial is very well written and explains the capabilities of the scripting engine very well.
Did you also try to implement the OAuth 2.0 Authorization Code flow with PKCE using Okta (i.e., https://developer.okta.com/docs/guides/implement-auth-code-pkce/overview/)?
Thanks for the comment. I will take note of this as I intend to cover more of authentication how-tos in ZAP in the future.
Pingback: Owasp Zap API Scanning with Authentication From Desktop to Docker (Part 1) - Augment1Security