A Gentle Introduction to ZAP Scripts (Part 2)

A Gentle Introduction to ZAP Scripts (Part 2)

Input Vector Scripts

Input vector scripts allow us to tell Zap which elements (e.g. query parameters) we want to attack as part of an active scan by using the helper class provided in function arguments of the script. Before they can be used, they must first be enabled and also the checkbox below (red arrow) must be ticked.

To find out more of the function(s) and their argument(s), you can look at the Java script interface:
https://github.com/zaproxy/zaproxy/blob/main/zap/src/main/java/org/parosproxy/paros/core/scanner/VariantScript.java

Passive Rules Script​

Passive rules scripts allow you to write your own scanners as part of a passive scan which happens during spidering. They will be run in addition to the passive rules built into Zap – https://www.zaproxy.org/docs/desktop/addons/passive-scan-rules/ 

To find out more of the function(s) and their argument(s), you can look at the Java script interface:
https://github.com/zaproxy/zaproxy/blob/main/zap/src/main/java/org/zaproxy/zap/extension/pscan/PassiveScript.java

Payload Generator Scripts​

Scripts that allow you to create custom payloads for fuzzing. We write these scripts when the provided payloads from ZAP is not sufficient/not suitable. They get executed when you trigger a Fuzz job. Before you can use them, you must enable them.

To find out more of the function(s) and their argument(s), you can look at the Java script interface:
https://github.com/zaproxy/zap-extensions/blob/master/addOns/fuzz/src/main/java/org/zaproxy/zap/extension/fuzz/payloads/generator/ScriptStringPayloadGenerator.java

Select a url node in the Site tree and select the Fuzz option. This will open up the Fuzzer dialog box.

Select some text on the left hand side and click on the Add button.

Click on the Add button again

Select Script from the drop down list

You will find your payload generator script for selection.

After you click Add, you will notice that the Processors button is now enabled. We shall take a look at that in the next section.

Payload Processor Scripts​

Payload processor scripts allow you to perform further processing of payloads before they are used for fuzzing. And again, don’t forget to enable it first. So continuing from the previous section, we click on the Processor button and you will get the Payload Processors dialog box. Click on the Add button.

To find out more of the function(s) and their argument(s), you can look at the Java script interface:
https://github.com/zaproxy/zap-extensions/blob/master/addOns/fuzz/src/main/java/org/zaproxy/zap/extension/fuzz/payloads/processor/ScriptStringPayloadProcessor.java

Select Script from the drop down list.

And your script should be available for selection. Click on the Add button.

Click all the OK buttons to go back to the main Fuzzer dialog box and you should be ready to start fuzzing.

Proxy Scripts​

Proxy scripts are scripts that allow you to do processing on the outgoing request and incoming request, very similar to HttpSender scripts but they are only executed when we are proxying via Zap (e.g. using firefox launched from Zap, or configuring a browser to use Zap as a proxy). You can configure the proxies via the Local Proxy section of the Options dialog box. Additional proxies can also be configured.

To find out more of the function(s) and their argument(s), you can look at the Java script interface:
https://github.com/zaproxy/zaproxy/blob/main/zap/src/main/java/org/zaproxy/zap/extension/script/ProxyScript.java

Selenium Scripts​

Selenium scripts are like hooks for you to be notified and inject some processing when a browser is launched, e.g. like adding a token. They get executed either from the ajax spider or manual opening of browser from zap (shown below). 

To find out more of the function(s) and their argument(s), you can look at the Java script interface:
https://github.com/zaproxy/zap-extensions/blob/master/addOns/selenium/src/main/java/org/zaproxy/zap/extension/selenium/SeleniumScript.java

You can also open the url in the browser via the Fuzzer dialog box. Refer to the Fuzzer Http Processor section to see how to get to this dialog box.

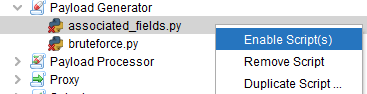
If it gets executed from the spider, the script is called synchronously during the initialization of the ajax spider but if you are manually opening up the browser, the script is called in a thread. Remember that the scripts need to enabled to be called. 

Sequence Scripts​

Sequence scripts allow you to create multi step requests to the server. This is for scenarios where there are pages that require multiple steps to reach them like online form wizards or they otherwise would not be reached. They can be written in Zest or any other supported languages in Zap.

To find out more of the function(s) and their argument(s), you can look at the Java script interface:
https://github.com/zaproxy/zaproxy/blob/main/zap/src/main/java/org/zaproxy/zap/extension/script/SequenceScript.java

If the sequence scripts are written in Zest:

you can add to the sequence script using the Site tree:

or via the History tab:

You can also record a Zest script to a sequence script by selecting the Record a Zest script button on the toolbar

and selecting Sequence as the type of script to record (shown below)

Sequence scripts are executed as part of active scanning. Before you can use them, in the Active Scan dialog box, you will need to tick on the Show Advanced Options checkbox before the Sequence tab becomes available to you. 

Clicking over to the Sequence tab, you will find your sequence scripts available for selection.

The general sequence of function calls for the sequence scripts are as follows:

For the scanSequence() function, it will be called when you select the menu item shown below.

 Go to Part 3

Leave a Comment

Your email address will not be published. Required fields are marked *