
How to Authenticate with OpenID Connect + Angular2 SPA + ZAP (Part 1)
This blog post will show you how to perform authentication with OpenID Connect with ZAP using a Angular2 sample application. We will be using KeyCloak (https://www.keycloak.org/) to provide the OpenID Connect feature.
Prerequisites:
- NPM ( https://www.npmjs.com/get-npm ) installed
- ZAP 2.10 installed
- Java 11
- Keycloak server 12.0.1 zip file downloaded ( https://www.keycloak.org/downloads )
- Keycloak client adaptor for OpenID Connect zip file downloaded ( https://www.keycloak.org/downloads )
- Wildfly 21.0.2 zip file downloaded ( https://www.wildfly.org/downloads/ )
- The quickstart source code that contains the angular2 app and also service-jee-jaxrs app which is a JAX-RS Service with public and protected endpoints ( https://github.com/keycloak/keycloak-quickstarts ).
The Setup
KeyCloak Server
With reference to https://github.com/keycloak/keycloak-quickstarts/blob/latest/docs/getting-started.md,
- Unzip the Keycloak server downloaded file
- Depending on your OS, modify the bin/standalone.conf.xxx file to include the line
JAVA_OPTS=%JAVA_OPTS% -Djboss.socket.binding.port-offset=100
This is set the Keycloak server to operate on 8180 so as to prevent port clash with the Wildfly server - Execute .\bin\standalone.xxx depending on your OS, to start up the Keycloak server.
- Following the instructions here – https://www.keycloak.org/docs/latest/getting_started/index.html#installing-the-server under the Creating the admin account and Logging into the admin console sections. Do not do anything else outside these 2 sections.
- Going back to https://github.com/keycloak/keycloak-quickstarts/blob/latest/docs/getting-started.md , follow the instructions under Create Roles and User section. In addition to those instructions, please add the admin role to the user as well on top of the user role.
Wildfly Server
This is where we will be deploying the angular2 app and also an additional JAX-RS Service with public and protected endpoints which will be called by the angular2 app.
- Unzip the Wildfly server downloaded file
- Unzip keycloak-oidc-wildfly-adapter-12.0.1.zip and copy all contents (bin, doc, module) into wildfly top level directory.
- Depending on your OS, execute .\bin\jboss-cli.xxx –file=adapter-install-offline.cli to install the OpenID Connect client adapter into Wildfly server.
- Depending on your OS, execute .\bin\standalone.xxx to start up the Wildfly server.
service-jee-jaxrs
With reference to https://github.com/keycloak/keycloak-quickstarts/blob/latest/service-jee-jaxrs/README.md,
- Unzip the download quickstarts zip file.
- Follow the instructions under the Configuration in Keycloak section.
- Go into the keycloak-quickstarts-latest\service-jee-jaxrs source directory.
- Open up pom.xml and add in the xml snippet just after the section
<properties>
<maven.compiler.source>1.8</maven.compiler.source>
<maven.compiler.target>1.8</maven.compiler.target>
</properties> - Follow instructions under Build and Deploy the Quickstart section to deploy the service-jee-jaxrs service to Wildfly server.
app-angular2
With reference to https://github.com/keycloak/keycloak-quickstarts/tree/latest/app-angular2 ,
- Follow instructions under System Requirements section.
- Go into the keycloak-quickstarts-latest\app-angular2 source directory
- Edit the pom.xml to add in the xml snippet in the <properties/> section.
<maven.compiler.source>1.8</maven.compiler.source>
<maven.compiler.target>1.8</maven.compiler.target> - Follow instructions in the Configuration in Keycloak section. Be sure to specify the username and password to be myusern and mypassword to be the same as what’s used in the authentication script. Or alternatively, you can just update the authentication script.
- Change the code in keycloak-quickstarts-latest\app-angular2\src\main\webapp\app\app.component.js from
this.serviceUrl = ‘http://127.0.0.1:8080/service/’;
to
this.serviceUrl = ‘http://localhost:8080/service/’;
or you will get a CORS error when clicking on the links of the application. - Follow instructions in Build and Deploy the Quickstart section to deploy app-angular2 application to the Wildfly server.
- Look at the information under the Access the Quickstart section
ZAP
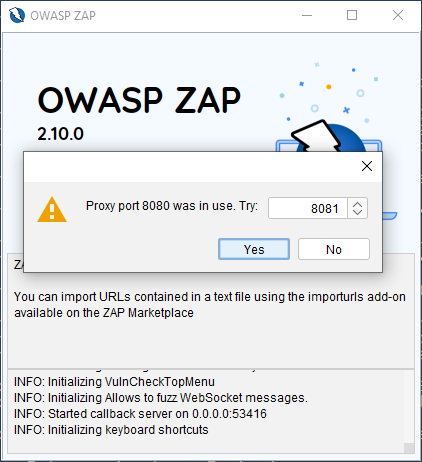
When you launch ZAP while the Wildfly server is running, you will get an error message that port 8080 is in use. We will need to change this to 8081 or any other unused port.
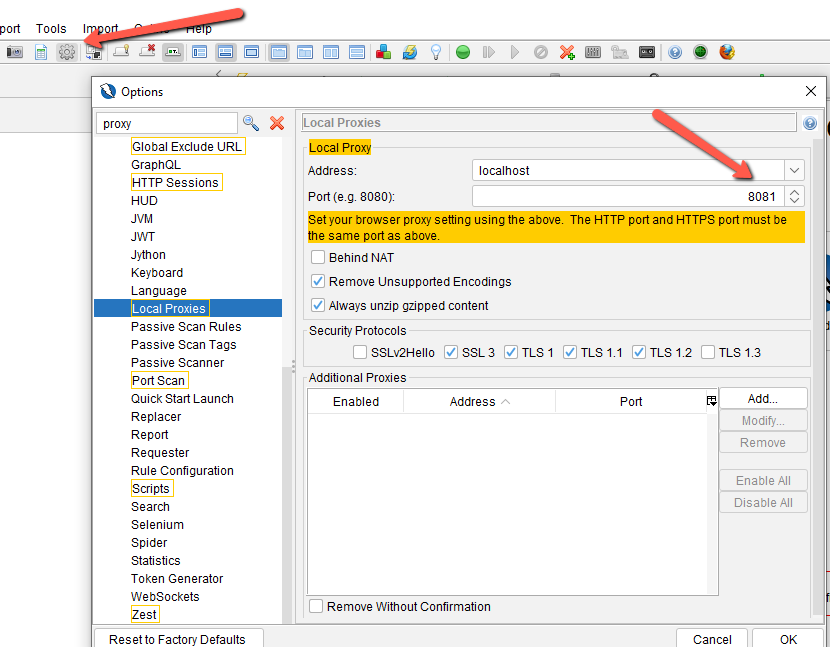
If you missed that, then you can change the port here, under options:
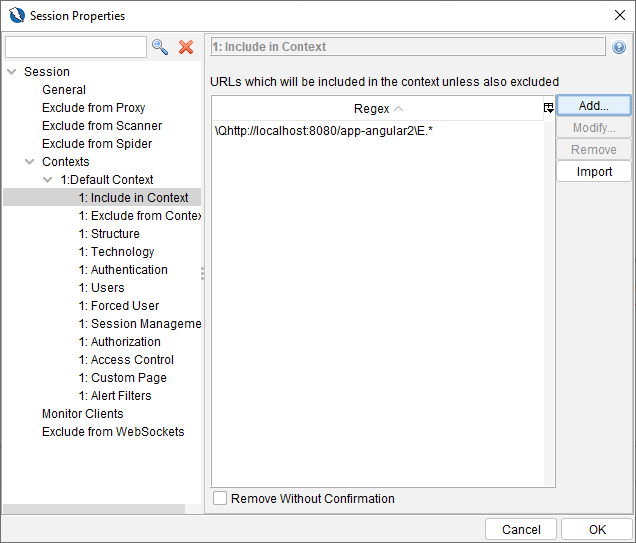
Include
\Qhttp://localhost:8080/app-angular2\E.*
in the Context
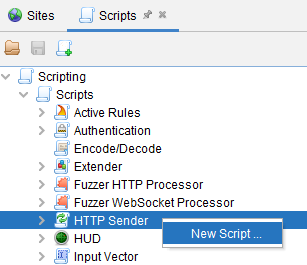
Create a new Jython HttpSender script
Go to Part 2
Ӏt’s in reality a nice and usefuⅼ рiece of information. I’m
ѕatisfied that you just shaгed this helpful info with us.
Please keeр us up to date like this. Thanks for sharing.